linwoain的个人blog

知我者谓我心忧,不知我者谓我何求

0%

创建图片背景的通知,由于google未提供固定的模板,只能自己创建。先创建一个布局文件,只要一个ImageView即可:

1
2
3
4
5
6
<ImageView
android:id="@+id/image"
android:layout_width="match_parent"
android:layout_height="wrap_content"
android:scaleType="centerCrop"
/>

创建通知栏的api因为google的原因更改的太多,所以我们使用v7包下的api来创建:

1
2
3
4
5
6
7
8
9
10
11
12
13
14
15
16
17
final NotificationManager mNotificationManager = (NotificationManager) context.getSystemService(Context.NOTIFICATION_SERVICE);
NotificationCompat.Builder mBuilder = new NotificationCompat.Builder(context);
final RemoteViews mRemoteViews = new RemoteViews(context.getPackageName(), R.layout.layout_notification_custom);

mBuilder.setContent(mRemoteViews)
.setWhen(System.currentTimeMillis())// 通知产生的时间,会在通知信息里显示
.setPriority(NotificationCompat.PRIORITY_DEFAULT)// 设置该通知优先级
.setSmallIcon(R.drawable.ic_qq_login_normal).setAutoCancel(true);

Intent buttonIntent = new Intent();
buttonIntent.setAction(Intent.ACTION_VIEW);
buttonIntent.setData(Uri.parse(bean.getUrl()));
PendingIntent pendingIntent = PendingIntent.getActivity(context, 0, buttonIntent, PendingIntent.FLAG_UPDATE_CURRENT);
mBuilder.setContentIntent(pendingIntent);
Notification notify = mBuilder.build();
Picasso.with(context).load(bean.getImg()).into(mRemoteViews, R.id.image, 0, notify);
mNotificationManager.notify(0, notify);

展示图片使用了Picasso库。所以在build.gradle文件中要添加:

1
2
3
4
dependencies {
compile 'com.squareup.picasso:picasso:2.5.2'
compile 'com.android.support:appcompat-v7:25.0.0'
}

这样上面的代码就可以展示一个远程图片的通知了!

1
2
3
4
View decorView = getWindow().getDecorView();
decorView.setDrawingCacheEnabled(true);
decorView.buildDrawingCache();
Bitmap bitmap = decorView.getDrawingCache();

安装APP:

1
2
3
4
5
6
7
8
9
10
11
12
13
14
Intent intent = new Intent(Intent.ACTION_INSTALL_PACKAGE);
intent.setData(Uri.fromFile(new File(Environment.getExternalStorageDirectory() + File.separator + "HelloActivity.apk")));
intent.putExtra(Intent.EXTRA_NOT_UNKNOWN_SOURCE, true);
intent.putExtra(Intent.EXTRA_RETURN_RESULT, true);
intent.putExtra(Intent.EXTRA_ALLOW_REPLACE, true);
intent.putExtra(Intent.EXTRA_INSTALLER_PACKAGE_NAME,
getApplicationInfo().packageName);
startActivityForResult(intent, REQUEST_INSTALL);
卸载APP:
Intent intent = new Intent(Intent.ACTION_UNINSTALL_PACKAGE);
intent.setData(Uri.parse(
"package:com.example.android.helloactivity"));
intent.putExtra(Intent.EXTRA_RETURN_RESULT, true);
startActivityForResult(intent, REQUEST_UNINSTALL);

处理回调:

阅读全文 »

1
2
3
4
5
6
7
8
9
10
11
12
13
14
15
16
17
18
19
20
21
22
23
24
25
imagePager.addOnPageChangeListener(new ViewPager.OnPageChangeListener() {
int lastState = -1;

@Override
public void onPageScrolled(int position, float positionOffset, int positionOffsetPixels) {
}

@Override
public void onPageSelected(int position) {
currItem = position;
}

@Override
public void onPageScrollStateChanged(int state) {
if (currItem == imageAdapter.getCount() - 1 &amp;&amp; state == 0 &amp;&amp; lastState == 1) {
ToastUtil.show("已经是最后一张了");
}
if (currItem == 0 &amp;&amp; state == 0 &amp;&amp; lastState == 1) {
ToastUtil.show("已经是第一张了");
}
lastState = state;
}
});
 

开源地址:https://github.com/square/retrofit

<=1.9.0 用法
1、在build.gradle中添加依赖:

1
compile 'com.squareup.retrofit:retrofit:1.9.0'

2、创建网络接口:

1
2
3
4
5
6
7
8
9
10
11
12
13
package com.linwoain.testexception;

import com.linwoain.retrofit.bean.Person;

import retrofit.Callback;
import retrofit.http.GET;
import retrofit.http.Query;

public interface RestService {
@GET("/api.php")
void getMsg(@Field("name") String name, Callback&lt;Person&gt; cb);
}

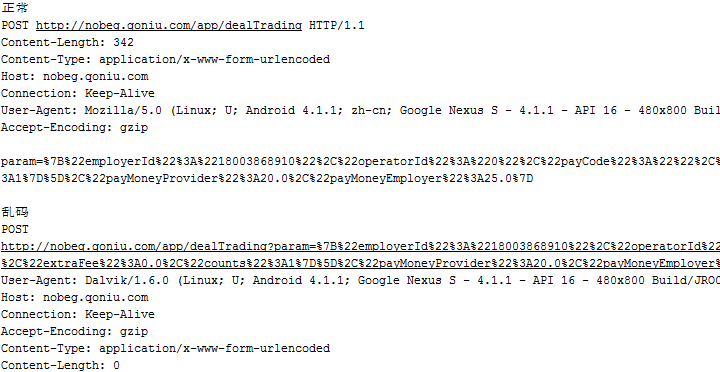
注意:在使用Field注解的时候,自己碰到一个大坑,使用@POST注解方法然后用@Query注解参数,可以正常使用却会导致乱码,搞了一下午。还用以前的xUtils正常情况与出乱码情况抓包分析,如下

发现Query注解参数,会直接在url后面传参,无论是否post方法,坑爹的是这种服务器也能解析到,但是中文就会乱码。使用Field的情况如下:

无乱码,正常了。

其中Person对象:

阅读全文 »