先看一段代码:
1
2
3
4
5
6
7
8
9
10
11
12
13
14
15
16
17
18
19
20
21
22
23
24
25
26
27
28
29
30
31
32
33
34
35
36
37
38
39
40
41
42
43
44
45
46
47
48
49
50
51
52
53
54
55
56
57
58
59
60
61
62
63
64
65
66
67
68
69
70
71
72
73
74
75
76
77
78
79
80
81
82
83
84
85
86
87
88
89
90
91
92
93
94
95
96
97
98
99
100
101
102
| public class BookmarksToClipboardActivity extends Activity {
BookmarkAdapter adapter;
ListView bookmarkList;
EditText search;
BookmarkApplication application;
Animation fadeIn;
ClipboardManager clipboardManager;
@Override
protected void onCreate(Bundle savedInstanceState) {
super.onCreate(savedInstanceState);
requestWindowFeature(Window.FEATURE_NO_TITLE);
getWindow().setFlags(FLAG_FULLSCREEN, FLAG_FULLSCREEN);
setContentView(R.layout.bookmarks);
bookmarkList = (ListView) findViewById(R.id.bookmarkList);
search = (EditText) findViewById(R.id.search);
application = (BookmarkApplication) getApplication();
fadeIn = AnimationUtils.loadAnimation(this, anim.fade_in);
clipboardManager = (ClipboardManager) getSystemService(CLIPBOARD_SERVICE);
View updateBookmarksButton1 = findViewById(R.id.updateBookmarksButton1);
updateBookmarksButton1.setOnClickListener(new OnClickListener() {
@Override
public void onClick(View v) {
updateBookmarksClicked();
}
});
View updateBookmarksButton2 = findViewById(R.id.updateBookmarksButton2);
updateBookmarksButton2.setOnClickListener(new OnClickListener() {
@Override
public void onClick(View v) {
updateBookmarksClicked();
}
});
bookmarkList.setOnItemClickListener(new OnItemClickListener() {
@Override
public void onItemClick(AdapterView<?> p, View v, int pos, long id) {
Bookmark selectedBookmark = (Bookmark) p.getAdapter().getItem(pos);
bookmarkListItemClicked(selectedBookmark);
}
});
initBookmarkList();
}
void initBookmarkList() {
adapter = new BookmarkAdapter(this);
bookmarkList.setAdapter(adapter);
}
void updateBookmarksClicked() {
UpdateBookmarksTask task = new UpdateBookmarksTask();
task.execute(search.getText().toString(), application.getUserId());
}
private static final String BOOKMARK_URL =
"http://www.bookmarks.com/bookmarks/{userId}?search={search}";
class UpdateBookmarksTask extends AsyncTask<String, Void, Bookmarks> {
@Override
protected Bookmarks doInBackground(String... params) {
String searchString = params[0];
String userId = params[1];
RestTemplate client = new RestTemplate();
HashMap<String, Object> args = new HashMap<String, Object>();
args.put("search", searchString);
args.put("userId", userId);
HttpHeaders httpHeaders = new HttpHeaders();
HttpEntity<Bookmarks> request = new HttpEntity<Bookmarks>(httpHeaders);
ResponseEntity<Bookmarks> response = client.exchange(
BOOKMARK_URL, HttpMethod.GET, request, Bookmarks.class, args);
Bookmarks bookmarks = response.getBody();
return bookmarks;
}
@Override
protected void onPostExecute(Bookmarks result) {
adapter.updateBookmarks(result);
bookmarkList.startAnimation(fadeIn);
}
}
void bookmarkListItemClicked(Bookmark selectedBookmark) {
clipboardManager.setText(selectedBookmark.getUrl());
}
}
|
这是一段普通的代码,而使用了Android Annotations之后的代码:
1
2
3
4
5
6
7
8
9
10
11
12
13
14
15
16
17
18
19
20
21
22
23
24
25
26
27
28
29
30
31
32
33
34
35
36
37
38
39
40
41
42
43
44
45
46
47
48
49
50
51
52
53
54
|
@NoTitle
@Fullscreen
@EActivity(R.layout.bookmarks)
public class BookmarksToClipboardActivity extends Activity {
BookmarkAdapter adapter;
@ViewById
ListView bookmarkList;

@ViewById
EditText search;
@App
BookmarkApplication application;
@RestService
BookmarkClient restClient;

@AnimationRes
Animation fadeIn;
@SystemService
ClipboardManager clipboardManager;

@AfterViews
void initBookmarkList() {
adapter = new BookmarkAdapter(this);
bookmarkList.setAdapter(adapter);
}
@Click({R.id.updateBookmarksButton1, R.id.updateBookmarksButton2})
void updateBookmarksClicked() {
searchAsync(search.getText().toString(), application.getUserId());
}
@Background
void searchAsync(String searchString, String userId) {
Bookmarks bookmarks = restClient.getBookmarks(searchString, userId);
updateBookmarks(bookmarks);
}

@UiThread
void updateBookmarks(Bookmarks bookmarks) {
adapter.updateBookmarks(bookmarks);
bookmarkList.startAnimation(fadeIn);
}
@ItemClick
void bookmarkListItemClicked(Bookmark selectedBookmark) {
clipboardManager.setText(selectedBookmark.getUrl());
}

}
@Rest("http://www.bookmarks.com")
public interface BookmarkClient {
@Get("/bookmarks/{userId}?search={search}")
Bookmarks getBookmarks(String search, String userId);

}
|
简化了太多的操作,但要想使用这个强大的工具,需要在Eclipse上做一些配置:
首先获取Android annotations的jar包:https://github.com/excilys/androidannotations
获取到的是两个jar包:首先在libs目录下添加androidannotations-api-3.2.jar 另外还需在工程目录下新建个文件夹(这里是compile-libs),将androidannotations-3.2.jar加入到这个目录 中
在工程的配置窗口中选中Java Compiler中启用Enable project specific settings
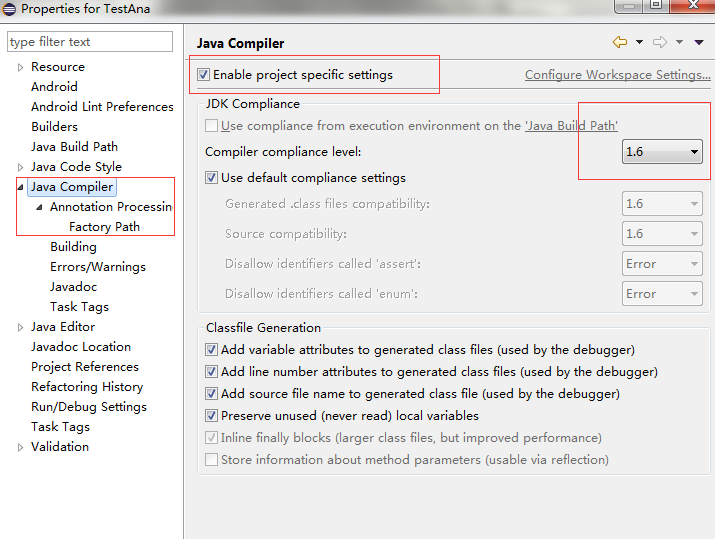
一般这一步是默认的,不过还是建议检查一遍
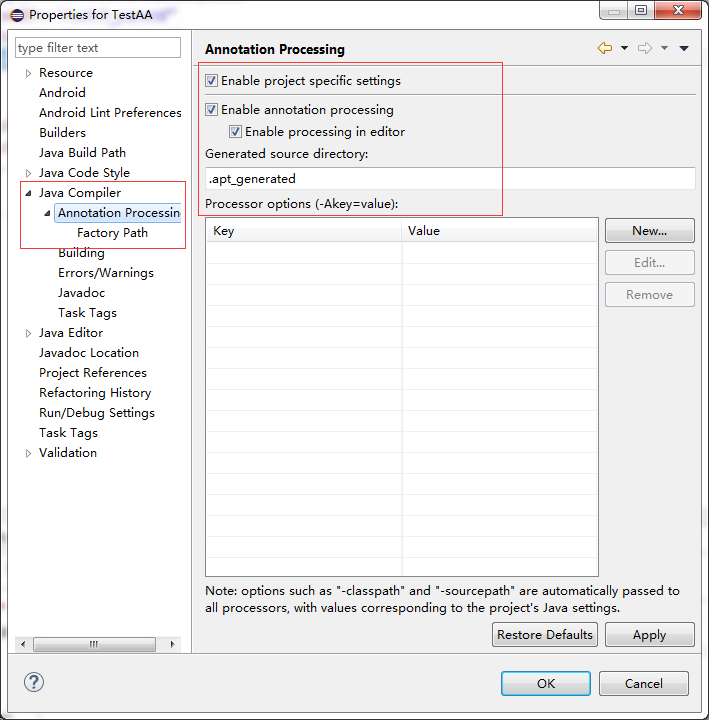
然后选中下一级中的Annotations Processing,依旧启用Enable project specific settings,然后启用Enable annotation processing 及 Enable processing in editor(后面这两项会自动选择) 然后在Generated source directory中输入 .apt_generated(自动添加)
然后在下一级Factory Path中启用Enable project specific settings,同时选择右方的Add ARS添加将相应工程下compile-libs下文件androidannotations-xx.jar文件
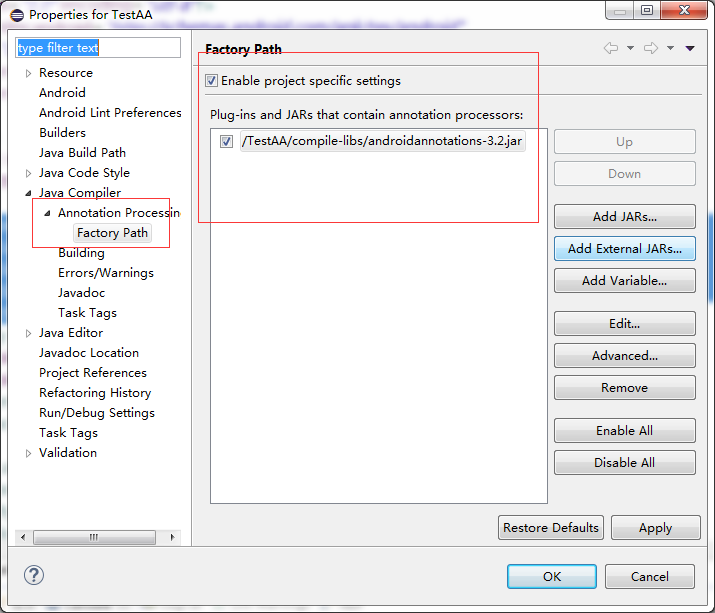
点击确定的话,可能需要重新编译,选YES即可。
然后在使用了Android Annotations的Activity在跳转或在清单文件中注册时需要在其类名后添加一个下划线“_”,如下:
1
2
3
4
5
6
7
8
9
10
11
12
13
14
| <application
android:allowBackup="true"
android:icon="@drawable/ic_launcher"
android:label="@string/app_name"
android:theme="@style/AppTheme" >
<activity
android:name=".MainActivity_"
android:label="@string/app_name" >
<intent-filter>
<action android:name="android.intent.action.MAIN" />
<category android:name="android.intent.category.LAUNCHER" />
</intent-filter>
</activity>
</application>
|
1
2
3
4
5
6
7
8
9
10
11
12
13
14
15
16
17
| package com.example.testana;
import org.androidannotations.annotations.Click;
import org.androidannotations.annotations.EActivity;
import org.androidannotations.annotations.ViewById;
import android.content.Intent;
import android.widget.Button;
import com.linwoain.ui.LinActivity;
@EActivity(R.layout.activity_main)
public class MainActivity extends LinActivity {
@ViewById
Button btn;
@Click(R.id.btn)
public void skip() {
Intent intent = new Intent(this, SecondActivity_.class);
startActivity(intent);
}
}
|
这里使用的都是最简单的功能,在https://github.com/excilys/androidannotations/wiki/AvailableAnnotations
有更多更详细的用法
下面是IntelliJ IDEA中的方法
创建工程,并将两个jar包引入到工程中

在androidannotations-api-xx.jar包上右键,add as library
菜单栏选择File – Seetings 或在使用快捷键ctrl + alt + s唤出Settings设置面板
选择 Build,Execution,Deployment – Compiler – Annotation Processors
选中使用的工程,选中右方的Enable annotation processing 使用Processor path,在右方的选择按钮中选择
androidannotations-3.2.jar包 ,再把Store generated sources relative to选项中 选择Module content root
然后选择OK。

之后先编译一遍程序
在选中的module右键,打开Open Module Settings 或者按F12键打开Project Structure
把相应module中gen选项中的source选项去除,或者直接在右方的Source Folders中点击gen目录右方的叉号去掉。
注意,在IntelliJ中,由于真正的启动Activity不在目录中,启动器无法启动,所有需要在Run/Debug Configurations中选择Do not launch Activity
在部署到手机或者模拟器后再单击图标打开应用
上面这段是当时写的没办法的办法,其实只要选择运行默认activity强制运行即可
3.android studio
Android Studio中启用方法更加简单,在module(不是project)中build.gradle
顶部启用插件
1
2
3
4
5
6
7
8
9
| apply plugin: 'android-apt'
dependencies {
classpath 'com.android.tools.build:gradle:1.1.0'
classpath 'com.neenbedankt.gradle.plugins:android-apt:1.4'
}
|
在module的build.gradle 最下方添加
1
2
3
4
5
6
7
8
9
10
11
12
| dependencies {
def AAVersion = '3.2'
apt "org.androidannotations:androidannotations:$AAVersion"
compile "org.androidannotations:androidannotations-api:$AAVersion"
}
apt {
arguments {
androidManifestFile variant.outputs[0].processResources.manifestFile
resourcePackageName 'com.linwoain.testannotation'
}
}
|
AAVersion 为版本号,apt下argument中的resourcePackageName 为包名
来自为知笔记(Wiz)